15 Kitchen Organization Hacks for Small Spaces — Clever, Space-Saving Ideas for Every Tiny Kitchen
Small kitchens work best when every inch pulls its weight. You’ll clear counters, free cabinet space, and speed up meal prep by combining decluttering, vertical storage, and smart containers into a single plan. Use a few targeted hacks—like risers, pull-out bins, and wall-mounted racks—to instantly expand usable space and make your kitchen feel larger and more efficient.
This post walks you through practical steps for cabinet and drawer optimization, compact pantry layouts, under-sink solutions, spice and baking organization, and clever mobile-storage ideas that fit tiny footprints. Whether you want faster cooking, simpler cleanup, or greener storage habits, you’ll get actionable tactics that work without costly renovations.
Decluttering Strategies
Focus on keeping only what you use regularly, rotating seasonal tools, and giving away items that no longer serve you. These steps free up cabinet and counter space and make daily cooking faster.
Separating Essentials From Non-Essentials
Start by emptying one cabinet or drawer and grouping items into three piles: Keep, Stash, Toss. Keep should include items you use at least once a week—everyday knives, a cutting board, a saucepan, measuring cups. Stash holds specialty tools used monthly—mandoline, citrus press, holiday bakeware. Toss covers broken, duplicate, or expired items like cracked Tupperware or dried-out spice jars.
Use a simple checklist on your phone: frequency of use, size, and replacement cost.
If an item scores low on all three, move it out of the keep pile immediately.
Label shelves for categories (cookware, prep tools, baking).
When you replace an item, follow the one-in-one-out rule to prevent re-clutter.
Seasonal Rotation of Kitchen Tools
Identify tools tied to seasons and store them elsewhere during off months—ice cream maker, turkey roasting pan, summer grill accessories. Use clear, labeled bins for seasonal items and keep them on a top shelf or in a closet to free prime cabinet space.
Create a short inventory list for each bin with three fields: item name, last-used date, and replacement cost. Review lists at the start of each season; donate or sell items you didn’t use the prior year.
For frequently rotated items, use stackable bins with lid labels and a photo on the outside so you can find things without unpacking. Store only one seasonal bin inside the kitchen and keep extras in hallway closets or storage rooms.
Donating Unused Items
Set a donation box in your kitchen and add items as you find them: duplicate utensils, unused gadgets, or unopened pantry goods. Drop off at local charities weekly or schedule a monthly pickup to avoid letting the box turn into a second storage area.
Before donating, check that items are clean and in working order; most charities won’t accept broken appliances. Use a short log (date donated, item, destination) to track tax-deductible donations and to remind yourself why you let the item go.
If an item has sentimental value but no use, take a photo and then donate it.
That preserves the memory while freeing physical space.
Making the Most of Vertical Space
Use wall area for storage, prep, and display to free counters and cabinets. Focus on open shelving for everyday dishes, hanging systems for cookware, and ladder racks for narrow footprints.
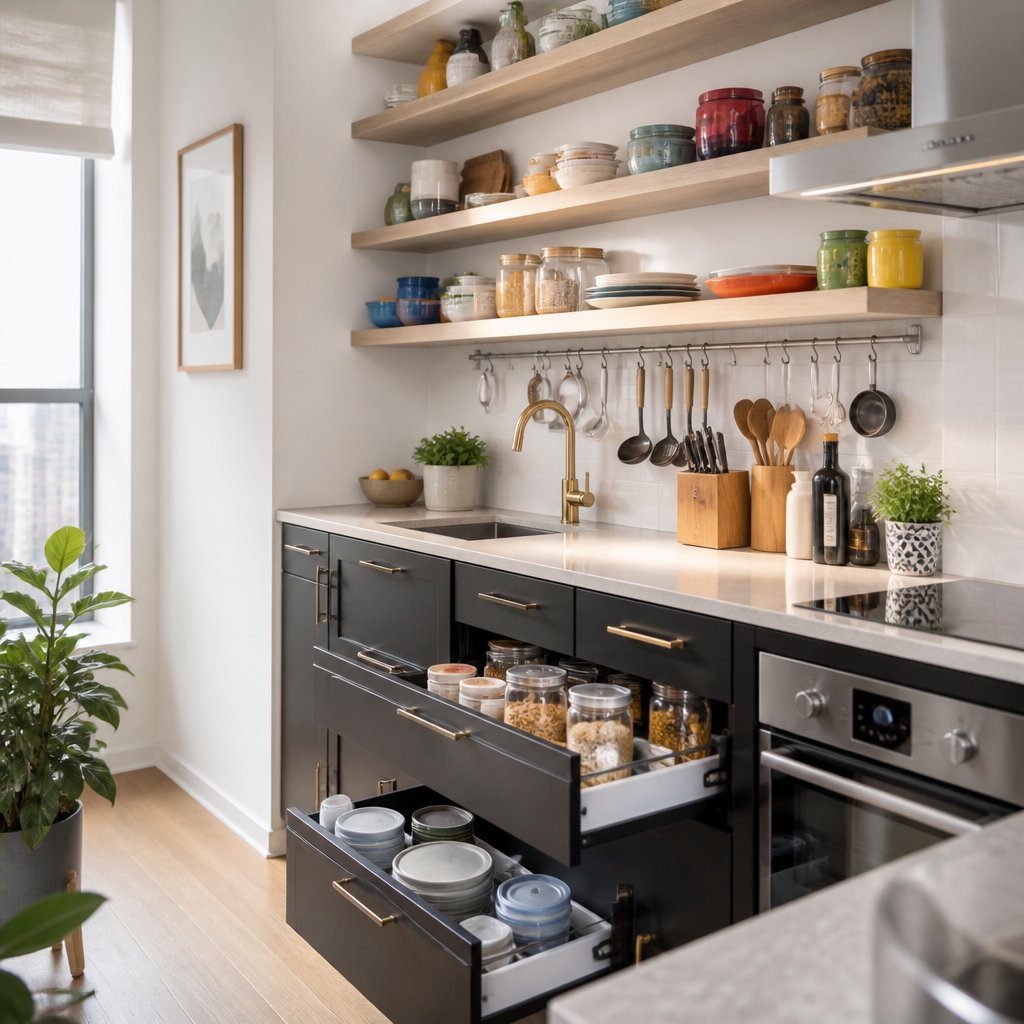
Installing Open Shelving
Open shelves let you store plates, bowls, and frequently used glasses within arm’s reach. Choose sturdy floating shelves or bracketed wood that span studs; 12–14 inches deep works for dishes, 10–12 inches for spices and jars.
Organize by function: keep plates and bowls together, glasses in one section, and a dedicated shelf for small appliances or meal prep items. Use shelf liners or non-slip mats to protect surfaces and prevent sliding.
Keep visual clutter low by grouping matching items and using baskets or labeled bins for loose packets, tea, or condiments. Leave a 12–18 inch clearance above countertops for small appliances or to create a light, open look. If your walls aren’t perfectly even, install a rail system or adjustable brackets so you can change shelf height without patching drywall.
Hanging Pots and Pans
Hanging cookware clears cabinet space and keeps heavy items accessible where you need them. Install a ceiling-mounted rack over an island or a wall-mounted rail with S-hooks above the stove; make sure anchors and hardware are rated for the combined weight of cast-iron and stainless steel pans.
Arrange by frequency: hang everyday skillets and saucepans nearest the stove and reserve one hook row for lids with lid organizers to prevent crowding.
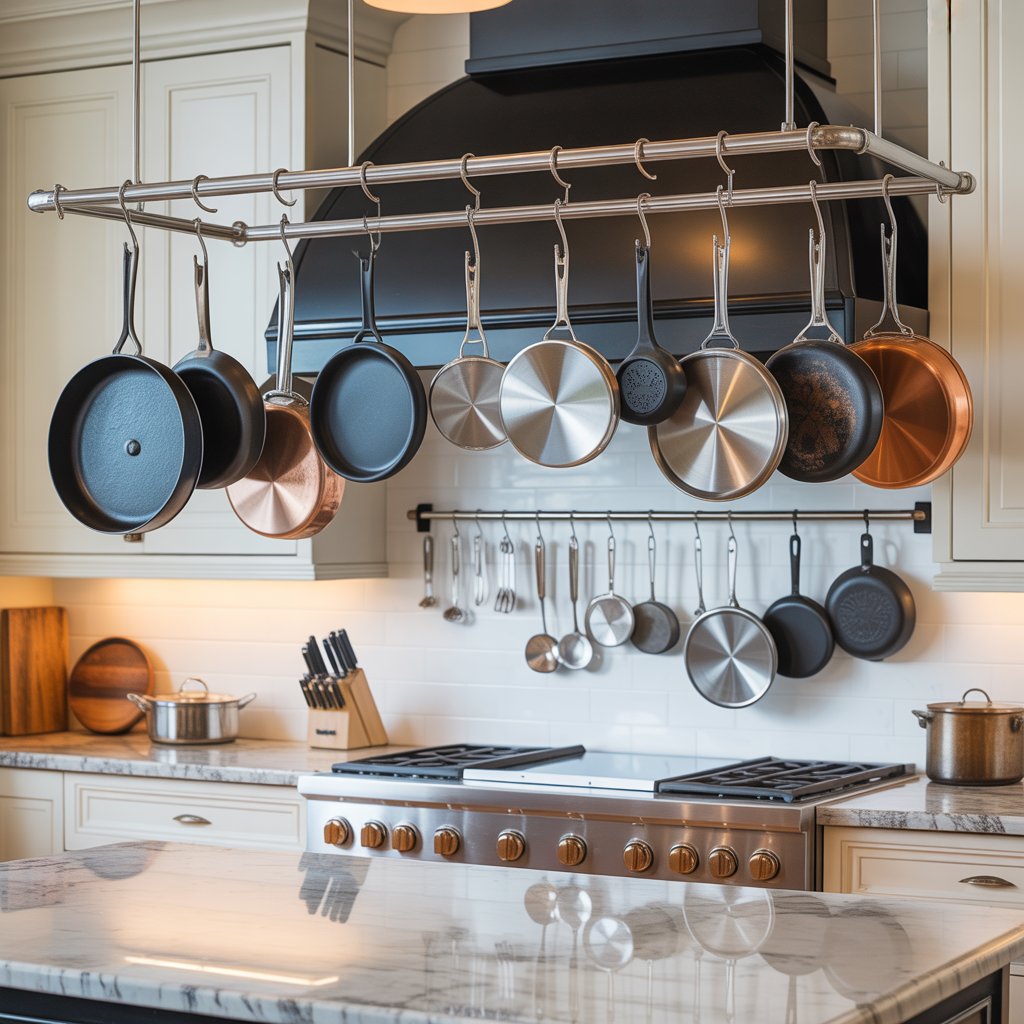
Use a mix of hook sizes and a magnetic strip for metal utensils to avoid tangled handles. If ceiling mounting isn’t possible, a sturdy wall rack or pegboard works well; pegboards let you reposition hooks and add shelves as your needs change.
Using Ladder Racks
Ladder racks work well in narrow kitchens and against unused wall runs for stacked storage and hanging space. Choose a compact, leaning ladder with 3–5 rungs or a slim freestanding ladder shelf anchored to the wall for safety.
Use rungs for hanging towels, oven mitts, and lightweight pans; add baskets on shelves for produce, cutting boards, and baking sheets. Keep heavier items on lower shelves to maintain stability.
Position ladder racks near prep zones or entry points for easy access to commonly used items. If your kitchen lacks floor space, consider a wall-mounted ladder rail that holds hooks and small shelves without reaching the floor.
Cabinet and Drawer Optimization
Focus on using vertical space, controlled access, and separation so you can reach items quickly, keep fragile pieces safe, and store more in the same footprint.
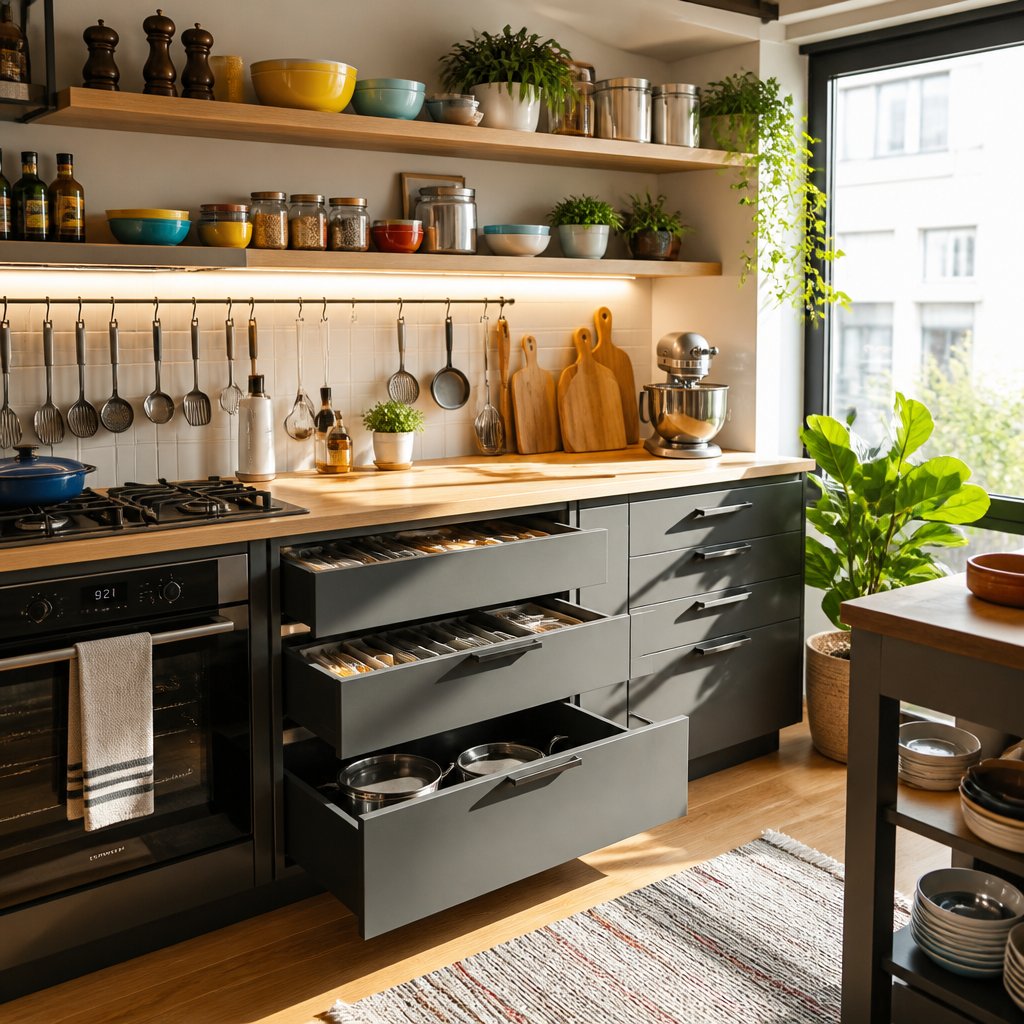
Stackable Pull-Out Organizers
Stackable pull-out organizers let you create layers inside cabinets for plates, bowls, pantry items, or small appliances.
Choose units with sturdy glides and full-extension slides so you can pull the whole stack forward to see items stored in the back. Adjustable-height stacking trays work best because you can fit tall bottles on one level and shallow items on another.
Install a pull-out at the back of a lower cabinet if you have deep shelves; this converts wasted rear space into usable storage you can access without kneeling. For pantry-style cabinets, use narrow stackable units that match shelf depth to avoid obstruction.
Tip: measure interior cabinet height and clearance with doors closed before buying to ensure lids and handles won’t catch.
Tiered Shelf Risers
Tiered shelf risers turn a single shelf into multiple visible layers for spices, canned goods, or glasses.
Opt for risers with non-slip feet and a lip at the front to keep items from sliding when you remove a jar. Metal or bamboo risers handle weight better than thin plastic and last longer under daily use.
Use short risers for spice jars and taller, two-tier risers for stacked plates or mugs. In upper cabinets, mount a single riser to the back of the shelf to create easy visual access to items you reach for less often.
Tip: group similar items on one riser (breakfast items, baking supplies) so you can grab what you need in one motion.
Drawer Dividers and Inserts
Drawer dividers give you quick order in utensil, gadget, and Tupperware drawers so items don’t jumble during opening and closing.
Measure drawer interior depth, width, and height before selecting inserts. Adjustable bamboo or plastic dividers fit most drawers and let you reconfigure compartments for spatulas, measuring cups, or lids.
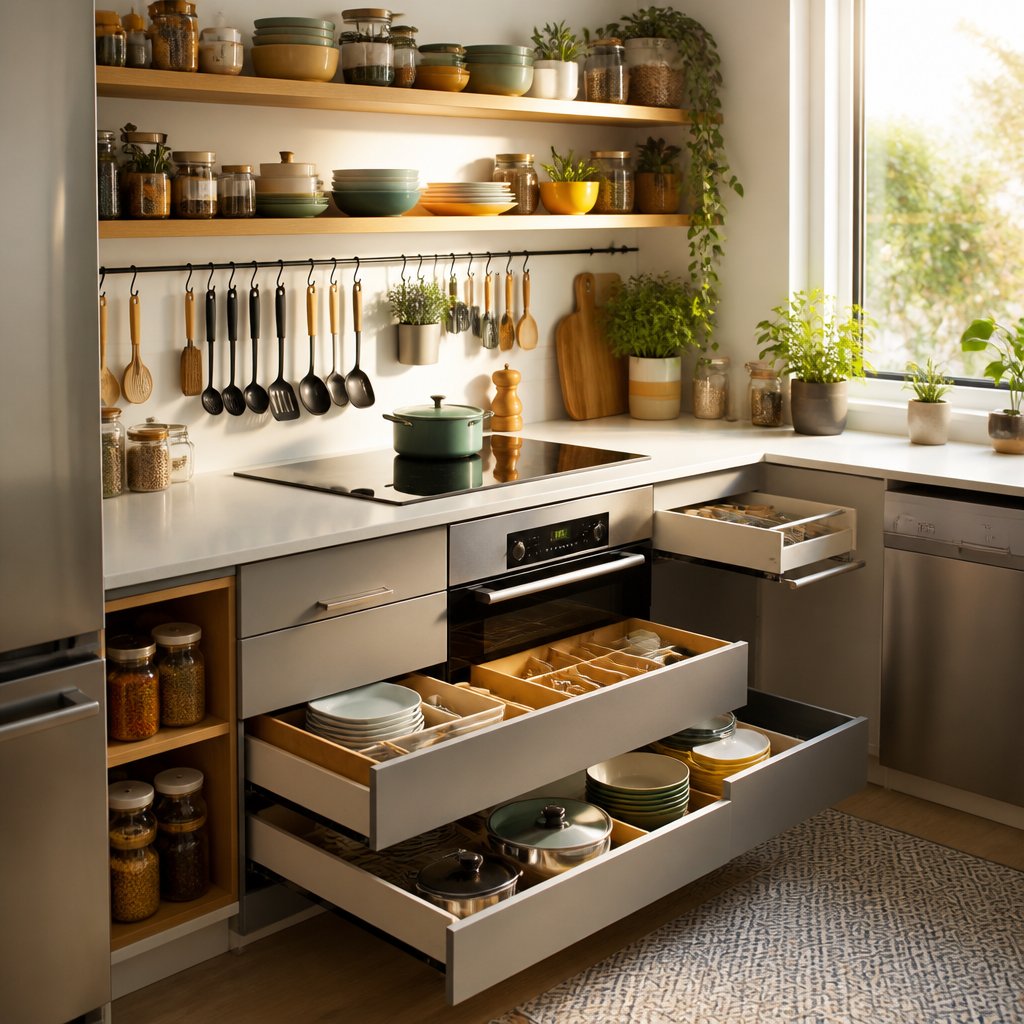
For Tupperware, use vertical inserts or a plate rack-style organizer so lids stand upright and containers stack neatly. For cutlery, invest in a shallow, fitted tray for knives and forks, and reserve a deeper section for larger tools.
Tip: label sections or use clear inserts for visibility; this reduces time rummaging and keeps frequently used tools front and center.
Creative Countertop Solutions
Clear, functional counters come from pairing vertical thinking with multi-use fixtures and smart mounting. Focus on freeing surface area while keeping frequently used items within easy reach.
Multi-Purpose Appliance Stations
Create a compact station for appliances you use daily—coffee maker, toaster, blender—on a single tray or slim rolling cart to contain crumbs, cords, and heat. Choose a heat-resistant, non-slip tray and position it near an outlet; use a power strip with surge protection mounted behind the cart to avoid loose cords across the counter.
Keep less-used accessories in a drawer or on a lower cart shelf to avoid visual clutter. Label a small basket for coffee pods, filters, or blender attachments so you can grab what you need without scattering items across the countertop. When not in use, slide the cart under an overhang or into a pantry to reclaim surface space.
Magnetic Knife Strips
Mount a magnetic knife strip on the backsplash to free drawer space and keep blades easily accessible. Pick a strip rated for the weight and length of your knives and install it at a comfortable reach—about 4–6 inches above the counter works for most people.
Clean knives before placing them on the strip to prevent corrosion, and avoid heavy cast-steel knives that can stress the mount. Use spacing guides or staggered placement so handles don’t collide, and reserve the strip for knives only; metal tools and lids can create unsafe crowding.
Under-Cabinet Hooks
Install under-cabinet hooks or a rail to hang mugs, utensils, or small pans directly beneath upper cabinets. Use screw-in hooks for heavier items and adhesive hooks only for light tools; test weight limits first to prevent falls.
Arrange hooks by frequency of use—mugs near the coffee station, spatulas by the cooktop. This keeps surfaces clear and gives each item a designated spot. If you have open shelving, align hooks with shelf supports so hanging items look intentional and stay balanced.
Compact Pantry Organization
Maximize visibility and accessibility so you can find ingredients fast and keep a tight inventory. Use clear, stackable storage and utilize the back of the door to reclaim wasted space.
Clear Containers for Dry Goods
Use uniform, airtight containers for staples like flour, sugar, rice, and pasta to save shelf height and prevent spills. Choose square or rectangular containers to reduce wasted gaps; label each with the product name and purchase or best-by date.
Stack containers by size and keep frequently used items at eye level. Reserve the top shelf for bulk or overflow in larger bins. For small packets (yeast, bouillon, seasoning), use clear drawer organizers or shallow bins so you can see contents at a glance.
Include a small measuring scoop or cup inside cereal and flour containers to speed prep. If space allows, keep a slim lazy Susan for oils, vinegars, and sauces so you can rotate items without reaching behind heavier jars.
Door-Mounted Storage Racks
Install adjustable, shallow racks on the pantry door to store bottles, spice jars, snacks, or wraps and foil. Pick racks with lips or grips to prevent items from shifting when you open the door.
Organize by category: spices and small jars on the top row, snack pouches and bars in the middle, and taller items like oils or spray cans on the bottom. Use clear pockets or wire baskets so you can instantly see inventory.
Mount a slim magnetic strip or small hook on the inside of the door for metal spice tins or scissors. Ensure the door still closes easily by measuring depth and choosing low-profile hardware.
Utilizing Unused Spaces
You can reclaim underused zones to store rarely used appliances, bulk pantry items, and flat baking sheets. Focus on creating accessible, dust-protected storage and adding pull-out access where possible.
Above-Fridge Storage Ideas
Above the fridge is ideal for items you use infrequently. Install a closed cabinet with a shelf or two to hide bulky cereal boxes, extra pots, or seasonal serveware. Use baskets or clear bins labeled on the front so you can pull the whole container down rather than hunting for single items.
If a full cabinet isn’t possible, add a shallow shelf with a lip to keep jars and boxes from sliding. Consider a decorative yet functional door-mounted rack on the cabinet door above the fridge to hold foil, plastic wrap, or small baking sheets. Leave a 2–3 inch gap at the top for airflow and to prevent heat damage to stored items.
Toe-Kick Drawers
Toe-kick drawers use the recessed space beneath base cabinets to store flat or seldom-used items. They work well for baking sheets, cutting boards, spare rolls of trash bags, or pet bowls. Measure depth and height precisely before ordering drawer inserts so you don’t compromise cabinet toe space or plumbing access.
Install full-extension slides rated for the weight you expect and add soft-close for smoother use. For DIY, buy shallow adjustable dividers to keep items from sliding when opened. Label the drawer face or use clear internal dividers so you can grab what you need without emptying the whole drawer.
Smart Food Storage Techniques
Maximize usable space and keep food visible and fresh by stacking smartly and tracking what you store. Use clear containers and simple labeling to reduce waste and speed meal prep.
Stackable Bins for Refrigerators
Use clear, stackable bins sized to your fridge shelves to group like items—dairy, deli meats, prepared meals, and snack packs. Choose bins with slightly sloped fronts so you can pull them out easily; cut-to-fit plastic drawers work well for odd shelf heights. Stack vertically when ceiling height allows, but avoid blocking air vents or cramming items against the back wall where they freeze.
Reserve one shallow bin near the door for condiments and one shallow front-facing tray for grab-and-go items. For taller bottles, use a narrow bin upright to prevent tipping. Label bin locations on shelves with removable tape so everyone returns items to the correct spot.
Labeling and Rotation Systems
Label containers with contents and date using waterproof labels or a dry-erase strip on reusable lids. Adopt a simple FIFO (first in, first out) rule: place newly purchased or cooked items behind older ones so older food gets used first. For meal-prepped portions, include reheating instructions and a use-by date to avoid confusion.
Use color-coded labels or stickers for different food types—green for produce, blue for dairy, red for proteins—to speed identification during busy meal prep. Keep a small inventory list on the fridge door or a notes app showing perishable items and their use-by dates; update it when you add or remove items.
Efficient Small Appliance Storage
Keep frequently used appliances accessible but off the countertop. Use assigned spaces that protect cords, allow ventilation, and make retrieval quick.
Designated Appliance Cubbies
Create cubbies sized to fit each appliance: measure height, width, and cord length before building or buying inserts. Label the front of each cubby so you return items consistently and avoid hunting for the toaster or blender.
Install a power strip inside or behind deeper cubbies to charge cordless appliances while stored. Leave 1–2 inches of clearance on all sides for airflow, and use vented cubby backs or small holes for heat dissipation when an appliance is cooling.
Use adjustable dividers for stackable items like food processors and lids. If you store heavy items, place them at waist height to avoid lifting strain. Consider clear-front doors or open-faced cubbies so you can see contents at a glance.
Retractable Shelves
Fit pull-out shelves on heavy-appliance shelves to bring back items to you instead of reaching. Choose full-extension drawer slides rated for the appliance weight—check the slide’s load capacity against the heaviest appliance you’ll store.
Mount slides to solid supports and use plywood-faced drawers for rigidity. Add non-slip liners and a shallow lip to prevent sliding during extension. For countertop stowage, use a retractable tray under a cabinet to slide the coffee maker out only when needed.
Consider soft-close or slow-retract mechanisms to protect fragile controls and finishes. If wiring is necessary, route cords through a grommet at the rear and secure them with Velcro straps so the shelf can move freely without unplugging.
Integrating Mobile Storage Options
Use mobile storage to add prep surface, targeted storage, and easy cleanup without permanent installation. Choose pieces that lock in place, match your workflow, and tuck away when not in use.
Rolling Carts for Extra Prep Space
A rolling cart gives you a temporary worktop and a place to stage ingredients, small appliances, or dirty dishes. Look for carts with a solid top (butcher block or metal) for chopping and heat-resistant surfaces for holding hot pans.
Prioritize casters that lock and a frame narrow enough to pass through your kitchen doorway. Shelves or drawers should fit the items you use most: measure your blender base, spice rack, and mixing bowls before buying.
Use vertical features—hooks, magnetic strips, or pegboard sides—to store utensils and free the top surface. Choose a cart with at least two shelves and one drawer if you need concealed storage for cutlery or plastic lids.
When not in use, push the cart under counters or alongside a pantry. Keep heavier items on the bottom shelf for stability and lighter, frequently used items at eye level.
Foldable Kitchen Islands
A foldable island expands workspace when you need it and collapses to free floor area afterward. Pick a model with a simple hinge or drop-leaf mechanism that you can open single-handedly while holding a bowl or pan.
Check dimensions both open and folded. Ensure the closed depth fits your clearance (typical folded depths range 6–12 inches). Material matters: solid wood offers durability, laminated surfaces resist stains, and metal frames handle heavier loads.
Look for features that matter to your routine: built-in drawers for utensils, wine racks, or a towel bar. If you plan to move the island, choose casters that lock and a lightweight top. Secure folding locks to prevent accidental collapse while you work.
Maximizing Under-Sink Areas
Use shallow, movable organizers and simple hardware tricks to carve usable zones around pipes and awkward corners. Focus on easy-access trays and a tension rod to keep cleaning tools upright and supplies visible.
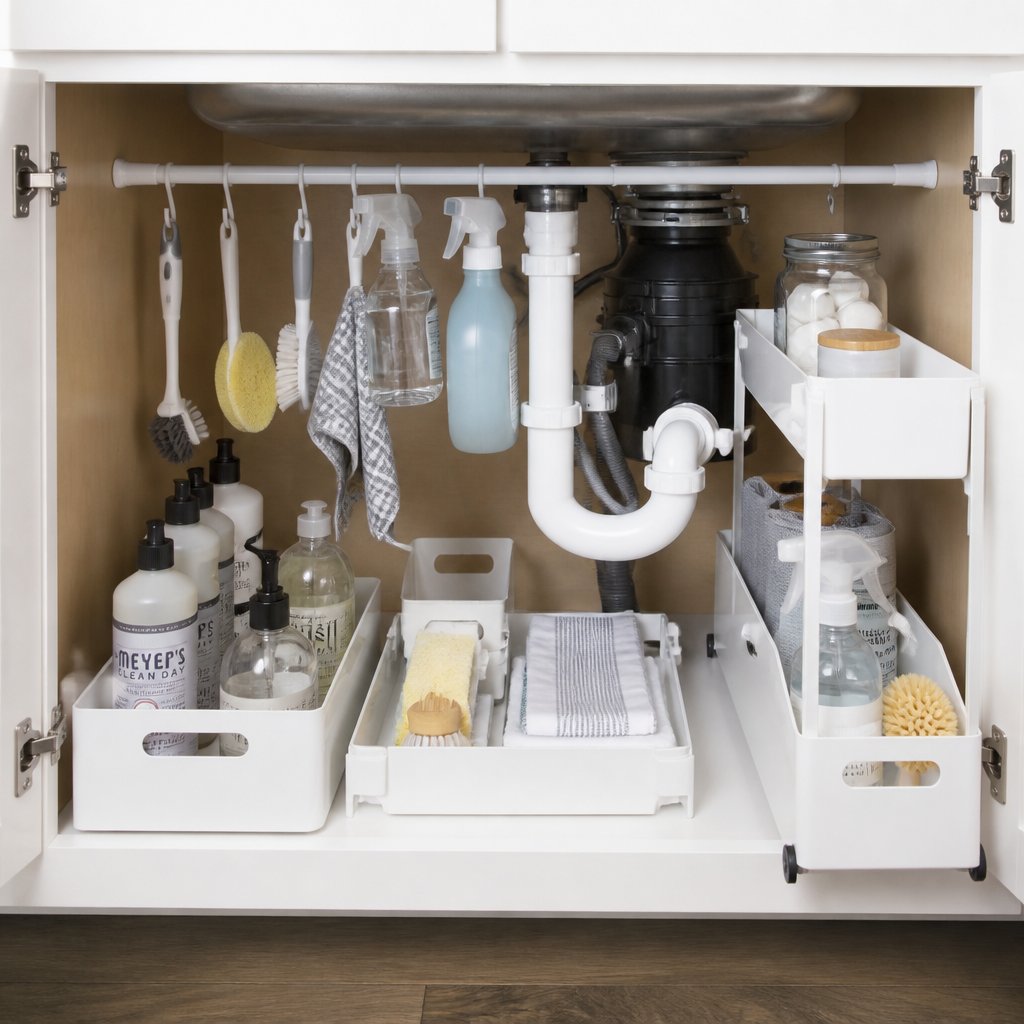
Expandable Storage Trays
Install an expandable under-sink tray that spans the cabinet width and slides forward for access. Choose a tray with adjustable dividers or tiered sections so you can separate sponges, brushes, garbage bags, and small cleaner bottles while avoiding contact with the P-trap.
Measure the cabinet depth and pipe placement before buying; a 20–24 inch deep tray fits most standard bases, but you may need a narrower model if the garbage disposal intrudes.
Use trays with low lips so liquids won’t pool and with rubber feet to prevent sliding. Label sections or use clear bins inside the tray for quick visual inventory. Consider a nested set: a shallow tray on top for daily items and a deeper pull-out below for bulk supplies.
Tension Rod Solutions
Mount a tension rod across the cabinet interior, about 2–4 inches below the shelf, to hang spray bottles by their handles. This frees shelf space and stops bottles from tipping when you pull other items out. Pick a corrosion-resistant rod and set it tight so it won’t sag under load.
Add S-hooks or small caddies to the rod for brushes, gloves, and dishcloths. For extra stability, place bumpers where the rod contacts the cabinet sides to protect finishes. If you need to separate zones, use two rods at different depths—one near the front for frequently used sprays and one farther back for rarely used items.
